


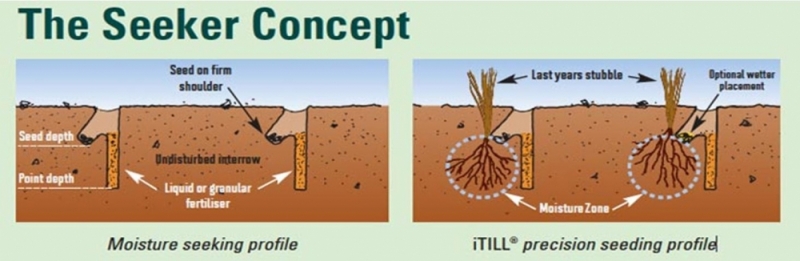
![seeker-concept[1]_584693132.jpg](/uploaded/images/banners/seeker-concept[1]_584693132.jpg)
The Evolution of iTill.
Soil Wetters have been available for 20 years, however, only in recent times has the cost of these wetters decreased to a level that has made them economically viable to use in broad-acre farming.
Over the last 5 years, a number of soil wetters were trialed in differing soil types, from sand over clay to non-wetting gravels. Some soil wetter formulations were noted to have a residual effect, that is they remained active and usable for more than 12 months, as can be seen below. The soil wetter aided in the retaining of moisture around the root zone, in effect creating a 'Moisture Zone' for the following year's crop to be sown into.
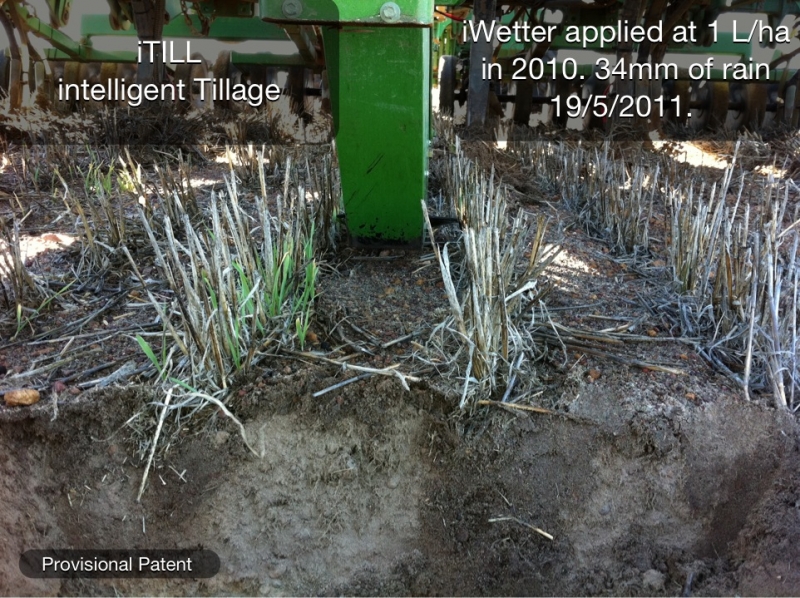
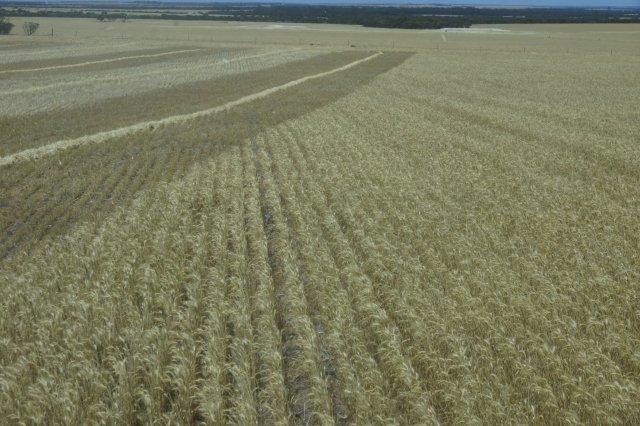
The trials showed that where the seeder was sowing in the inter row, crop germination was patchy and delayed. Where the seeder tyne placed the seed in the previous year's row, germination was excellent.
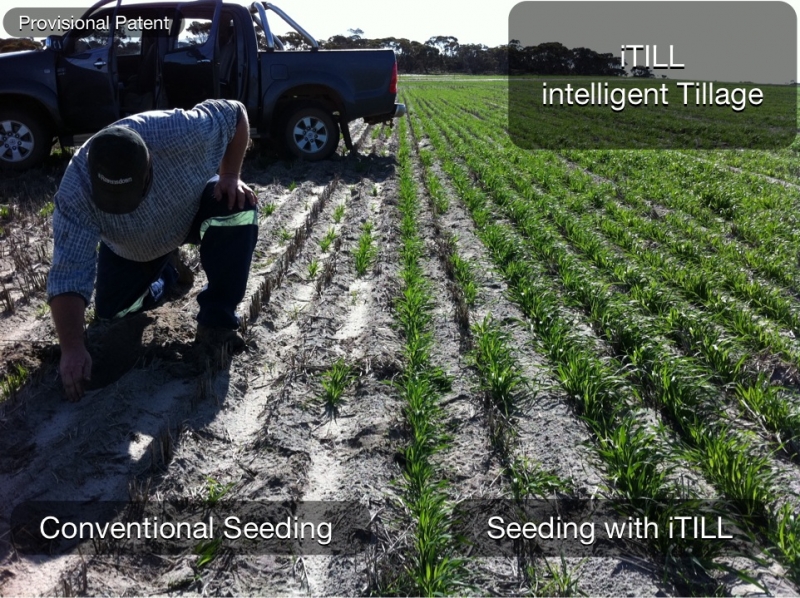
Having recognised the problem, the challenge now was how best to steer the seeder and very accurately place the seed in the 'Moisture Zone' without drying the soil profile, but still providing some soil disturbance to help with the breakdown of zoot disease and soil aeration. The system also needed to have excellent trash flow capabilities and be able to operate at speeds of 10km/hr without throwing too much soil into adjoining rows and still maintain accurate seed placement.
iTiLL Components
Steerable Drawbar
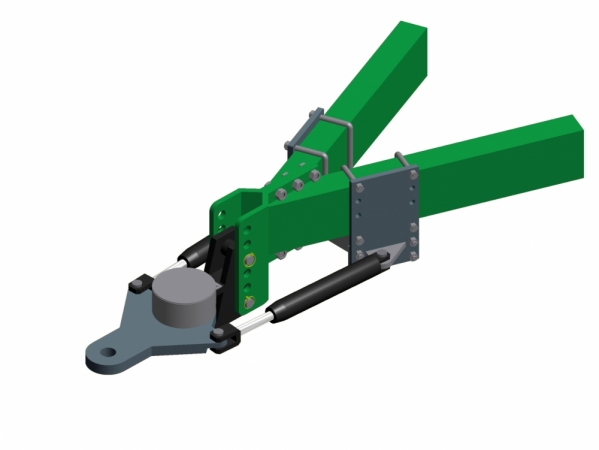
The steerable drawbar is controlled with two hydraulic cylinders. The position sensor mounted ontop of the drawbar allows the iTiLL Electronic Controll Unit (ECU) to know where the centre position is, as well as the left and right limits. All positions are fully adjustable. The drawbar has 40 cm (16') of travel and can be limited to what ever tyne spacing is fitted to the seeder. Typically, a seeder on 10" tyne spacing would require a drawbar swing of 12'. The drawbar has been designed to be a load bearing drawbar and is suitable to use with DBS seeder bars.
Row Tracking Unit
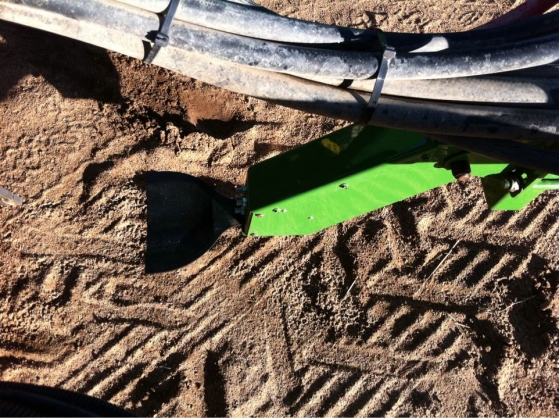
The Row Tracking Unit (RTU) is height adjustable and has stump jump provision built-in. A camera is mounted adjacent to the RTU allowing the operator to monitor row tracking accuracy as well as soil throw and stubble blockages. Two sensor paddles are provided, as barley usually requires a narrower paddle compared to wheat.
Touch Screen Tablet Computer and Software
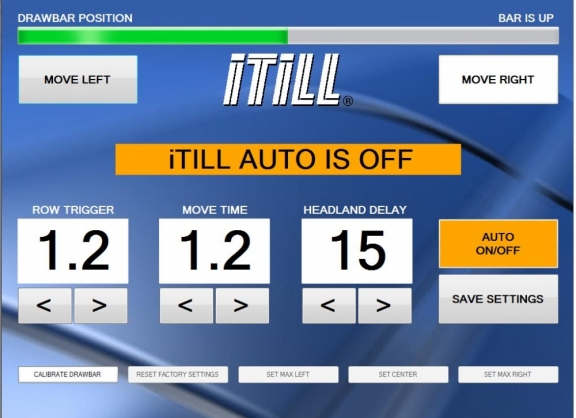
A Tablet computer running the iTiLL software controls all the settings of the system and also displays the camera image. Software updates and remote diagnostics are built-in, providing 3G mobile or wifi coverage is available.
The iTiLL software has the following features:
-
Workman friendly - fully automatic.
-
Automatically centres the drawbar when starting a new run line.
-
Adjustable steering delay when starting a new run line, allowing the seeder a set amount of time to straighten up before activating the steering.
-
Line tracking sensitivity - adjustable depending on the amount of straw present for the paddle to sense.
-
Drawbar swing limits - alarm sounds if drawbar swings too far left or right. Operator can then either nudge the tractor autosteer AB line or manually adjust the iTiLL drawbar so as to jump into the next run line.
-
Headland float mode, when turning on a headland, the drawbar can go into float mode making it easier for track tractors to turn.
Tractor integration
The iTiLL Electronic Control Unit is a plug and play solution. All that is required is a tractor hydraulic service valve where the two hoses from the steering cylinders are plugged in. The iTiLL ECU connects straight into the appropriate switch on the tractors arm rest. When in operation the switch will be isolated, however, when iTiLL is turned off the operator has full functionality of the associated valve. This is useful if a diverter valve is fitted to double up the functionality of a hydraulic circuit, i.e. wing fold and iTiLL steering. The wiring harness is prewired to allow for a diverter valve to be fitted anywhere on the seeder.
The John Deere iSteer system is fully comptible with iTiLL and can be operated simultaneously on the same hydraulic circuit - on the run. The operator can swap seamlessly from either system without stopping.
The iTill System - How it works.
Year 1
Step 1. You need to be on 10 cm or better Autosteer in your tractor. The straighter the lines now – the easier they are to follow in coming years. The paddocks need to be set up for straight line guidance, using a single set of AB points. These AB points need to be saved in the autosteer system so you can use them the following year.
Step 2. The seeder bar needs to be setup so that all the seeding tynes are exactly spaced across the bar. If they are at 10” spacing, they all need to be exactly 10” spacing. This makes it easier for the steerable drawbar to direct the tyne along last year’s row.
Step 3. The starting point in the paddock needs to be noted on a farm map. In following years you will need to start seeding the paddock in the same direction. We recommend that you don’t skip rows when turning on headlands to keep it easy for the follow year. If you haven’t got enough space at the end of the run, give yourself another lap at the end.
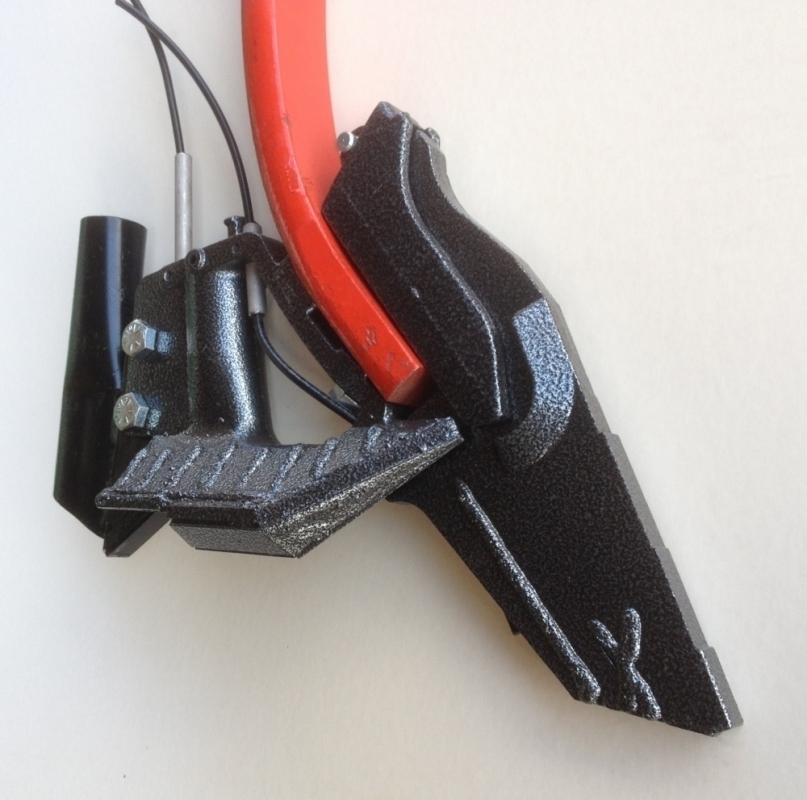
Step 4. Fit the AgMaster SEEKER Side Banding Boots. These seeding boots have excellent depth control, minimise soil throw, allow iWetter and fungicides to be placed precisely next to the seed and offer good seed - fertilise separation if a double shoot seeding system is preferred.
Step 5. Apply iWetter. This can be done either behind the presswheel in a stream or underneath next to the seed using the Agmaster SEEKER Side Banding boot with iWetter. In order to do this you will need a tank or liquid cart and the appropriate plumbing. There are cost effective ways to trial the system and we can assist in supplying all the components you will require.
Step 6. Harvest - For optimal results in year 2 it is recommended that the harvester autosteer is set to a 10 degree offset. This eliminates problems caused from wheel tracks and the burning of wind rows allowing the sensor paddle to have a continuous line of stubble to follow.
Year 2 – The following Seeding.
Step 7. Fit the iTill Steering drawbar, row tracking unit, monitor and camera system.
Step 8. Control your summer weeds and be organised to go seeding when you want to.
Step 9. Make sure the tractor driver starts the paddock in the same place as the previous year and the AB points line up.
Step 10. Adjust the Row tracking unit (Paddle) so that the tyne is 25mm to the left of the previous year’s row. This will maximise trash flow and reduce the drying out of the 'Moisture Zone'.
Step 11. Adjust your speed and seeding depth to allow for the correct soil throw and furrow formation. This can be easily done using the supplied camera and in cab monitor.
Step 12. Monitor your seeding depth and dont sow too shallow. The seed must be in the Moisture Zone. Allow for soil crusting and the drying of the top 1 to 2 cm of soil. If in doubt sow deeper.
For more information please call (08) 9362 6811.